Category: Uncategorized

  • Mylar Pouch Closures Compared: Zippers, Sliders, Tear-Notches, and Tin-Ties

    Mylar Pouch Closures Compared: Zippers, Sliders, Tear-Notches, and Tin-Ties

    The closure is the part of a mylar pouch a customer touches every single time they use it, and it is also the part most likely to undo the barrier you paid for on the film. A high-mil foil laminate with a poorly chosen top closure can still go stale, leak powder, or fail an opening test. Choosing the closure is therefore a barrier decision as much as a convenience one, and the right answer depends on what is inside, how often the bag gets reopened, and whether the product is regulated.

    Every zipper is a hole in your top seal

    Start from the trade-off that governs all of it. A plain heat seal with a tear-notch has no interruption running through it, which is why long-term food storage bags pair a simple flat seal with oxygen absorbers rather than a zipper. The moment you add a reclosable track, you add plastic mass and a channel across the top of the bag that the heat seal has to bridge. Manufacturers engineer around this well, but the general rule holds: the more reclosability you specify, the more attention the top seal needs, and the more you should verify barrier performance rather than assume it.
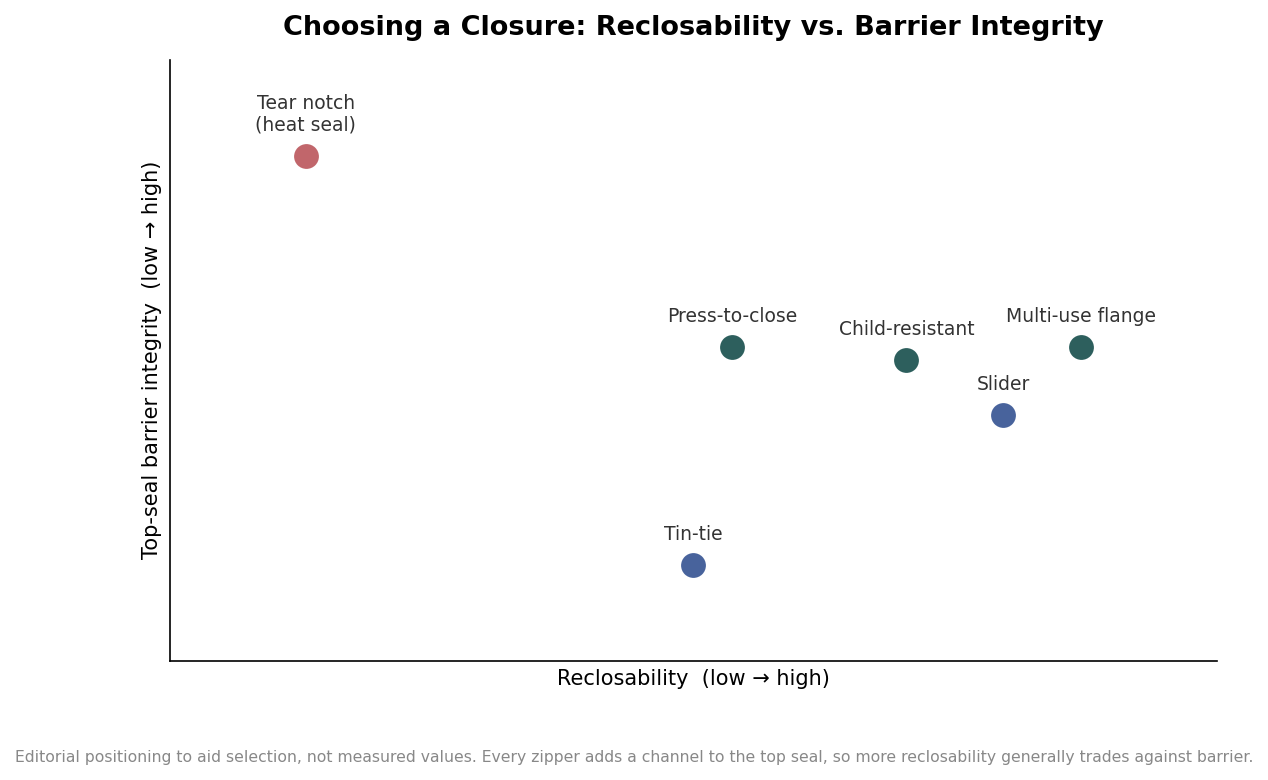
    Scatter positioning chart plotting mylar closure types on reclosability versus top-seal barrier integrity, with tear notch high on barrier and low on reclosability, and multi-use flange and slider high on reclosability
    Editorial positioning of common closures on the reclosability-versus-barrier trade-off.

    Read that positioning as a guide to the tension, not a scoreboard. A tear-notch sits high on barrier and low on reclosability because it is a one-time opening; a multi-use flange zipper sits high on reclosability because it is built to survive repeated handling. Where your product needs to land on those two axes is the first thing to settle.

    Press-to-close and twin-track: the default zippers

    The single-track press-to-close zipper is the most common closure on custom pouches, and for good reason. It is economical, it prints and laminates cleanly, and consumers know instinctively how to pinch it shut. Its weakness is human: people tend to seal from the middle outward and leave air gaps at the corners, so it protects freshness only as well as the customer closes it. For spices, seasoning blends, and dry snacks reopened a handful of times, it is usually the sensible default. When the contents are heavier, the bag is large, or there is internal pressure from liquids or a gusset full of coffee, a twin-track profile with two interlocking tracks adds strength and resists being popped open, which is why tamper-evident and larger foil bags often use it. There are also purpose-built variants worth knowing: a powder zipper adds channels that let trapped powder fall back into the bag so the track still seals, and a liquid-tight dual-track zipper is designed to hold viscous contents without weeping.

    Sliders: paying for a guaranteed seal

    A slider replaces finger dexterity with a guided mechanism. Because the slider forces the two tracks together from one edge to the other, it closes the bag completely instead of relying on the customer to press evenly, which removes the air-gap problem that dogs press-to-close. That reliability is why sliders show up on pet food, protein powders, lawn and garden products, and regulated goods. It is a premium closure, and it earns the premium in perceived quality: research on flexible packaging has found consumers willing to pay meaningfully more for reclosable packaging, on the order of double digits in percentage terms, so the added cost can be defensible on a mid-to-premium product where the closure is part of the experience. Sliders are commonly offered across stand-up pouch widths in roughly the seven-and-a-half to twelve inch range, so they suit most retail formats.

    Reclose durability, and why it varies so much

    Not all reclosable zippers survive the same number of openings. A standard flange can start to lose grip after as few as ten open-and-close cycles, while a wide-flange multi-use profile is built and tested to survive well over a hundred. That difference is invisible on a spec sheet that just says “resealable,” so if your product is something a customer dips into daily for a month or more, ask specifically about cycle life rather than accepting a generic zipper.
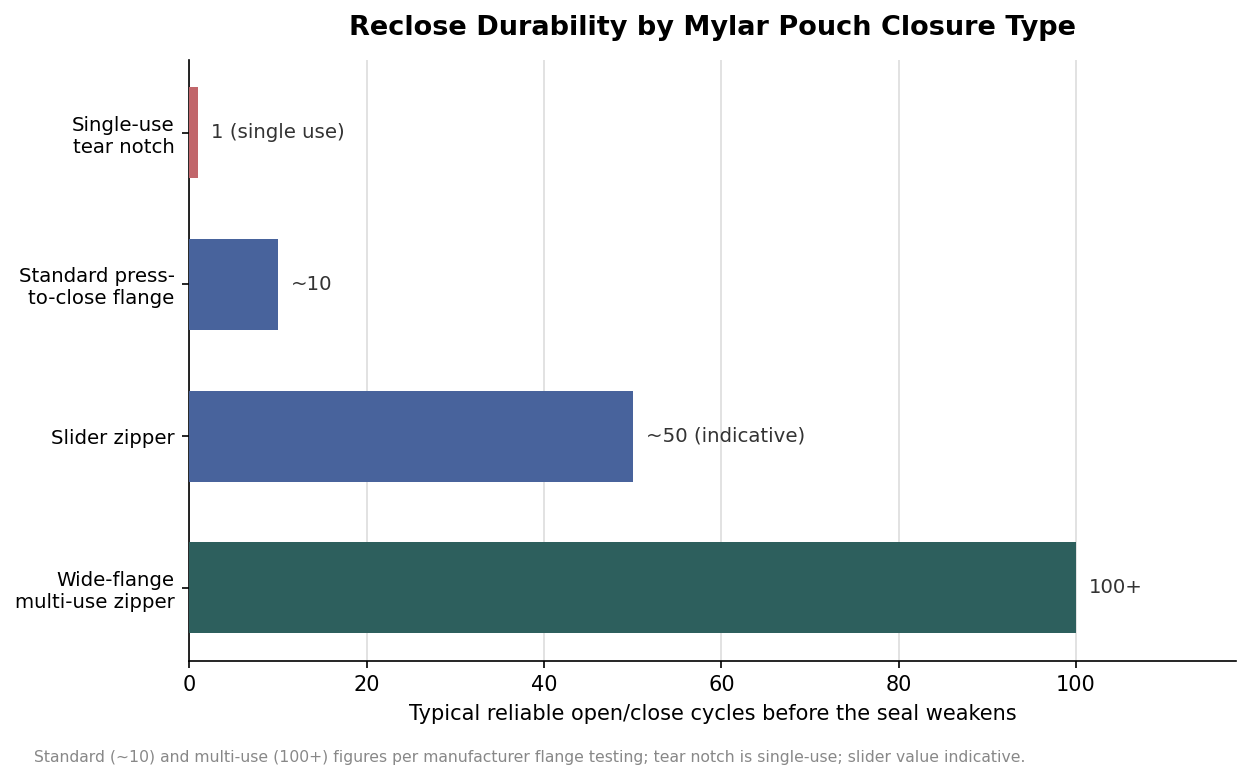
    Horizontal bar chart of typical reliable reclose cycles by mylar pouch closure type: single-use tear notch at 1, standard press-to-close flange around 10, slider around 50 indicative, and wide-flange multi-use zipper at 100 plus
    Reclose durability varies widely between a standard flange and a wide-flange multi-use zipper.

    The practical read is that closure choice should track how the product is actually consumed. A single-serving or gift item that gets opened once is poorly served by an expensive multi-use zipper; a bulk pantry staple reopened every day is poorly served by a bargain flange that fails halfway through the bag’s life. Match the cycle rating to the reopening pattern and you avoid paying for durability you will not use or shipping a closure that quits early.

    Tear-notches and tin-ties: when a reseal is the wrong goal

    Sometimes the best closure is no zipper at all. A tear-notch is a small nick in the seal edge that lets a customer open the bag cleanly by hand, with no reclose function. It is the cheapest option, it preserves the fullest barrier because nothing interrupts the seal, and it is the right call for single-use portions, samples, and anything decanted in one go. The tin-tie, a folding wire strip most associated with coffee, is a different philosophy again: it lets the bag be rolled down and refolded many times but is not airtight, which is actually useful for freshly roasted coffee that needs to off-gas. If freshness after opening is not the priority, or if the product benefits from breathing, a non-airtight closure is a feature rather than a compromise.

    Child-resistant closures and the standard behind them

    For regulated products, the closure is not a style choice, it is compliance. Child-resistant pouches are tested against a recognized standard, ASTM D3475, and come in several mechanisms including press-to-close variants, latch styles, and sliders with a locking action. They are commonly stocked in sizes such as twelve and a quarter by nine by four inches and can be made to custom dimensions. One point manufacturers are careful about, and buyers should be too: these are called child-resistant, not child-proof, because the standard measures difficulty for young children rather than guaranteeing impossibility. If you sell cannabis, nicotine, or similar regulated goods, the certification is the deciding factor and the aesthetic decisions follow from there. For everything else, work down from the two questions that actually matter, which is how good the barrier needs to be and how often the bag gets reopened, and the closure choice usually makes itself.
  • Mylar Bag Thickness and Barrier: What the Mil Number Actually Buys You

    Mylar Bag Thickness and Barrier: What the Mil Number Actually Buys You

    Thickness is the first spec most buyers latch onto when ordering mylar bags, and it is also the one most often misread. A higher mil number feels like more protection, so it gets treated as a proxy for freshness and shelf life. It is not, quite. Mil measures how thick the laminate is, and thickness governs how tough and stiff the bag feels — but the barrier that actually keeps oxygen, moisture, and light out comes from a specific layer inside the laminate, not from the total thickness. Understanding that split is what lets you spend on the right thing instead of paying for stiffness you do not need or skimping on the layer that matters.

    What a mil is, and the layers underneath it

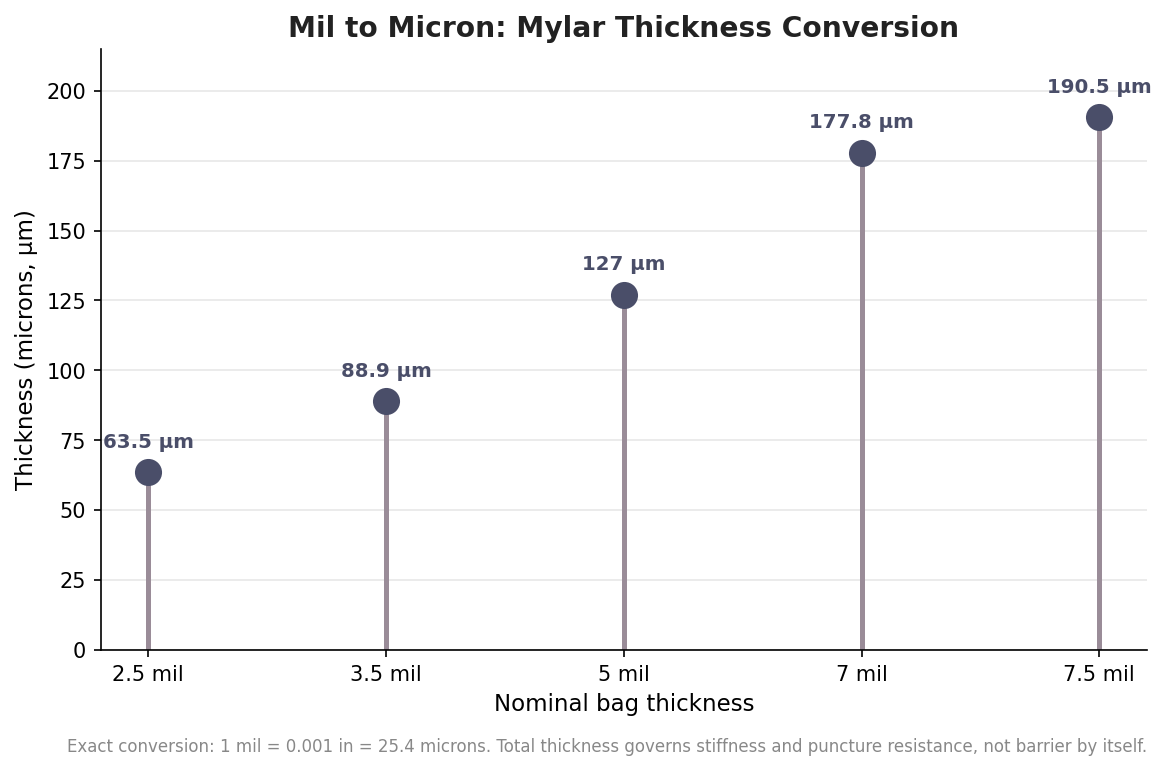
    A mil is one-thousandth of an inch, or about 25.4 microns. Custom mylar bags generally run somewhere between roughly 2 and 7.5 mil, so a 5 mil bag is about 127 microns of laminate and a 7 mil bag about 178. That laminate is not a single sheet of mylar. A typical food pouch is a three-layer build: an outer layer of BoPET (biaxially oriented polyester) that provides the print surface and structural strength, a middle barrier layer — either a metallized polyester (VMPET) or a true aluminum foil ply — that blocks light, gas, and moisture, and an inner polyethylene layer that melts under a heat seal to close the bag. Each layer has a distinct job, and only one of them is the barrier.

    Lollipop chart converting mylar thickness from mils to microns: 2.5 mil is 63.5 microns, 5 mil is 127 microns, 7.5 mil is 190.5 microns
    Mil to micron is an exact conversion at 25.4 microns per mil; thickness sets stiffness and puncture resistance, not the barrier.

    Thickness is about toughness, not barrier

    The single most useful thing to know is that thickness and barrier are largely independent. Adding mil makes a bag stiffer, more puncture-resistant, and more resistant to crushing in shipping, but it does not by itself make the bag more airtight. The oxygen and moisture barrier is set by the metallized or foil layer and the quality of the lamination, and the light barrier depends on whether that middle layer is opaque. This is where a lot of long-term-storage advice quietly hinges on a detail: a thin, translucent metallized bag can let a little light through, while a bag with a genuine aluminum foil ply is effectively lightproof whether it is 5 or 7 mil. So thicker equals better protection is only half right — thicker equals tougher, and the barrier question is a separate one you have to ask directly about the layer structure.

    Matching the mil to what goes inside

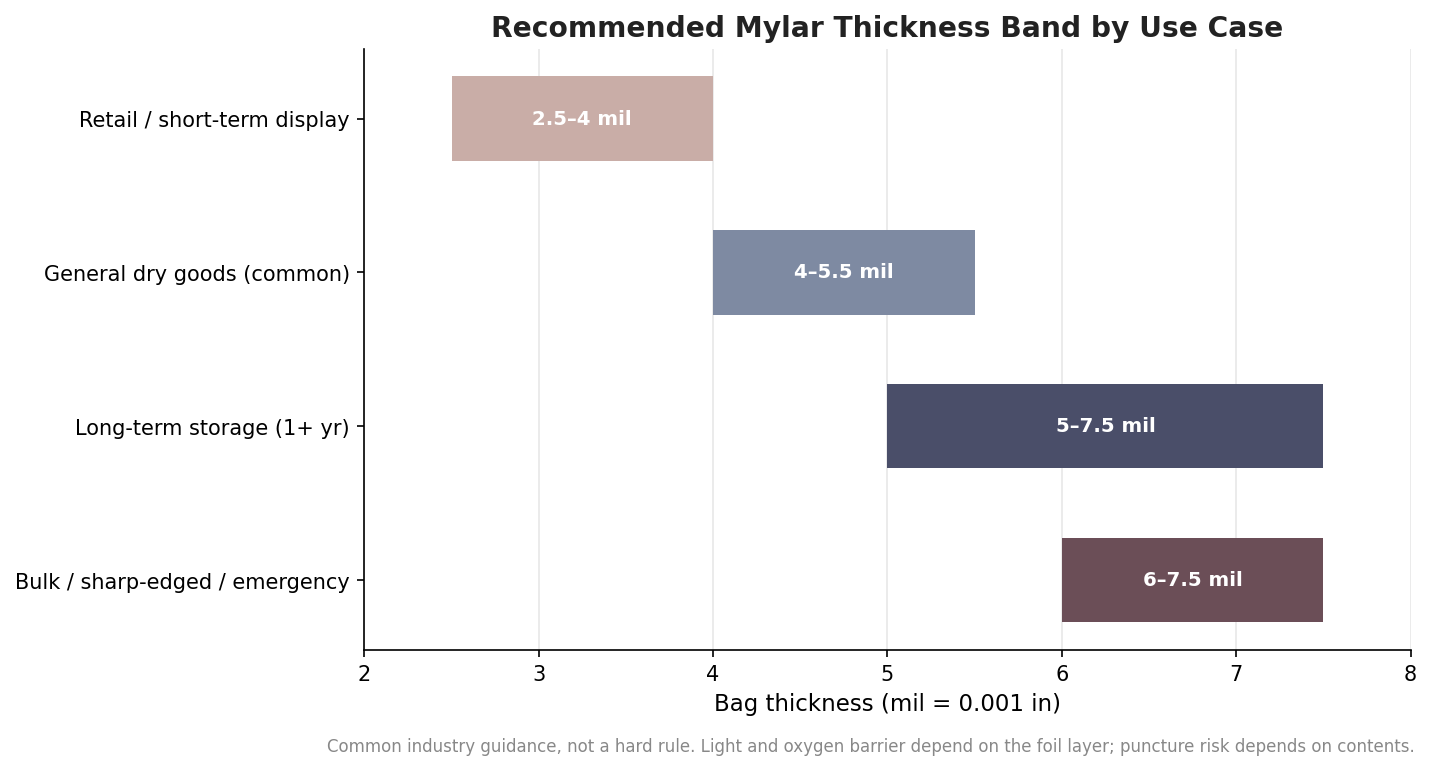
    With that separation in mind, thickness becomes a question about the contents and the handling, not the shelf life. For retail products on a shelf for weeks or a few months — snacks, coffee in active rotation, supplements — bags in the roughly 2.5 to 4 mil range are pliable, print well, and cost less, while 5 mil is the common all-round choice that balances durability against price. For anything headed into long-term storage measured in years, the guidance shifts up to about 5 to 7.5 mil, largely because the extra thickness survives stacking, moving, and time without developing pinholes. The other driver is the shape of the contents: soft powders like flour or fine grains sit comfortably at 5 mil, while sharp or hard items — dry pasta, whole grains, anything with edges or points — hold up better at 6 mil and above, where the wall resists puncture from the inside. The bands overlap rather than snapping to single numbers, as the ranges below show.

    Horizontal range chart of recommended mylar bag thickness bands by use case: 2.5 to 4 mil for retail, 4 to 5.5 mil general dry goods, 5 to 7.5 mil long-term storage, 6 to 7.5 mil bulk or sharp-edged
    Recommended thickness bands overlap by use case; the right mil depends on handling and contents, not shelf life alone.

    Shelf life is a system, not a single spec

    It is worth being honest that thickness is one lever among several, and often not the decisive one. What actually determines how long dry food keeps in a sealed mylar bag is the combination of a real oxygen and light barrier, a clean and complete heat seal, an appropriately sized oxygen absorber for the volume and residual air, and the moisture content of the food going in. A 7 mil bag with a weak seal or no oxygen absorber will underperform a well-sealed 5 mil bag every time. That is why careful storage guidance pairs thickness with those other steps rather than treating mil as the headline number. When you specify a bag, it is reasonable to ask the supplier not just for the mil but for what the barrier layer actually is, and to confirm the inner sealant suits the sealer you will use.

    Specifying thickness on a custom order

    On a custom print run, thickness interacts with a couple of other decisions. If you want a clear window so customers can see the product, remember that the window is a spot with no foil barrier — a deliberate trade of some shelf life for shelf appeal, reasonable for fast-moving retail and less so for multi-year storage. Heavier gauges cost more per bag and add shipping weight, so there is no reason to default to 7 mil for a product that will sell within a month. And because thickness does not much change the sealing process, choosing a heavier bag for durability will not complicate your line. A practical way to land the spec is to start from the two questions the thickness actually answers — how rough is the handling, and how sharp are the contents — settle the mil from those, and treat the barrier layer, the seal, and the oxygen absorber as the separate decisions that carry the shelf-life load. The figures here reflect common industry guidance rather than a single standard, and the right number for a given product is best confirmed with a sample.

  • Die-Cut Mylar Bags: When a Custom Shape Earns Its Tooling

    Die-Cut Mylar Bags: When a Custom Shape Earns Its Tooling

    Every other spec on a mylar bag changes what gets printed on a rectangle: the material, the finish, the closure, the size. Die-cutting changes the rectangle itself. A die-cut bag is trimmed to a custom outline, whether that is a bottle silhouette, a rounded pillow shape, a header with a hang hole punched through it, or a bag cut to the shape of the product inside. The freedom is real and it almost always looks good on a shelf. It also adds a cost step and a lead-time step that a plain pouch does not carry. So the useful question is not whether a custom shape looks better. It is whether the shape earns its tooling, and answering that means knowing what die-cutting adds and where it actually pays off.

    What “die-cut” actually means on a pouch

    Die-cutting is the step that cuts the sealed laminate to a shape other than a plain rectangle. On short digital runs it is often done with a laser or a digital cutter, which needs no physical tool; on larger runs a shop builds a steel-rule cutting die, a one-time tool that stamps the outline for every bag in the order. Either way the cut has to register to the printed artwork, so a shape is not free-floating: your design and your outline are locked together, and a busy silhouette leaves less room for error at the edge. The most common die-cut feature is not a dramatic shape at all. It is a hang hole, or euro slot, punched into the top header so the bag can hang on a retail peg. Those slots run to a common size of roughly 32 by 10 millimeters, with round versions around 5 to 8 millimeters across, and the exact hole has to match the peg hardware in the store, so confirm it rather than assuming.

    The three shapes that actually sell

    Most of the value in die-cutting comes from three moves, not from novelty outlines. The first is the hang hole above: if your bag has to merchandise on a pegboard or a clip strip, that punched header is the difference between a product that displays and one that sits in a bin. The second is rounded corners, which read as more premium, are gentler in the hand, and remove the sharp points that snag on other packaging and catch during shipping. The third is a full custom silhouette cut to the product itself, which is the expensive option and the one that earns the most attention on a crowded shelf. A pet-treat bag cut like a bone or a juice pouch cut like the fruit does something a printed picture cannot: it changes the object’s outline, and the eye catches an unfamiliar outline before it reads any label. Reserve that move for the hero product, not the whole line.

    Where the cost really lives

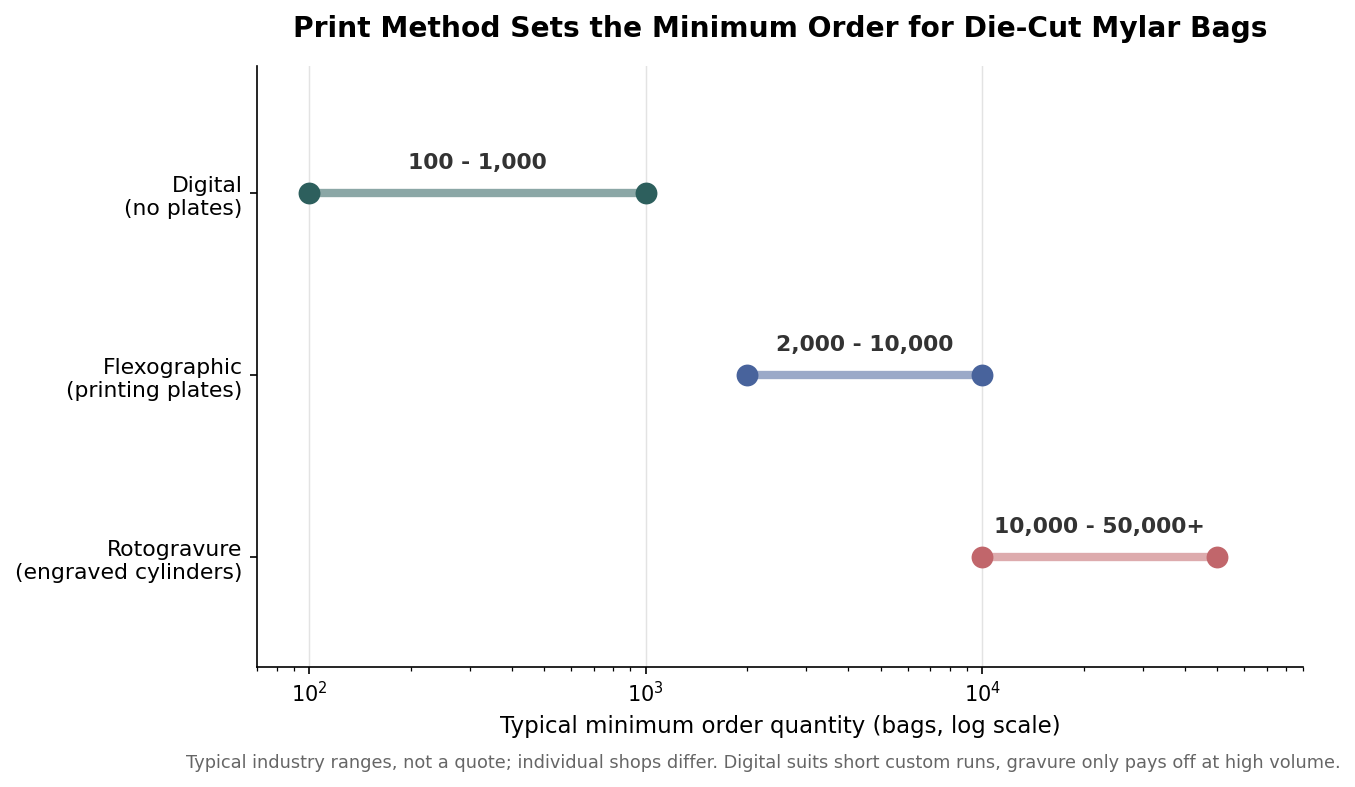
    A die-cut pouch carries two costs a plain one does not. The first is the one-time tooling or die charge for a custom cutting die, and for plate-based printing a separate plate or cylinder charge for each color. Because those are one-time fees spread across the whole run, they barely register on a large order and hurt most on a small one. The second cost is simply that print method sets your minimum. Digital printing needs no plates, so custom shapes are available at low volumes, with minimums that often start around 100 to 500 bags. Flexographic printing brings plate costs and pushes minimums into the low thousands, and rotogravure, which gives the lowest per-unit cost at scale, only makes sense once you are ordering tens of thousands because you are paying to engrave cylinders first. The practical read is that a first custom-shaped run belongs on digital, and gravure is a decision you grow into.

    Range plot of typical minimum order quantity by print method: digital 100 to 1,000, flexographic 2,000 to 10,000, rotogravure 10,000 to 50,000 plus
    Your print method sets the minimum: digital enables short custom-shape runs; gravure only pays off at high volume.

    Match thickness to the shape and the fill

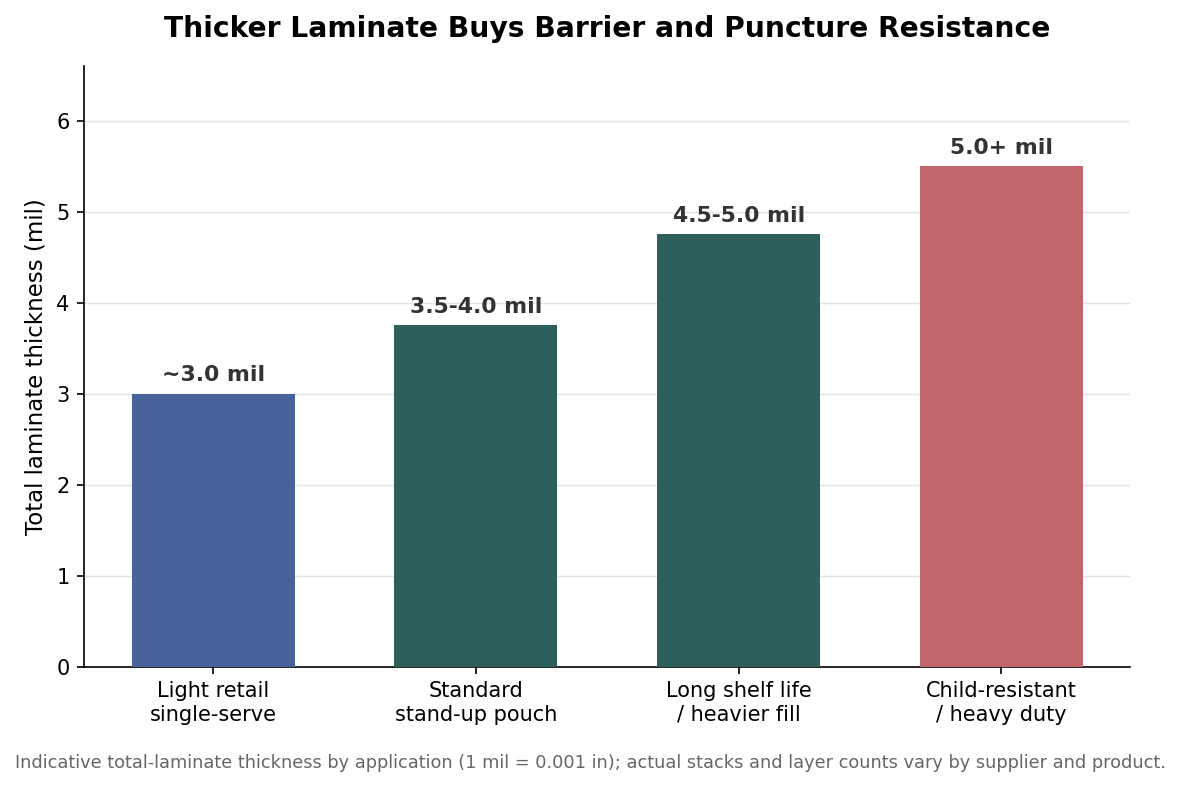
    A custom outline puts more demands on the film than a rectangle does, because a curved or notched edge has to seal cleanly and hold its shape when the bag is filled. Total laminate thickness on a stand-up pouch is usually quoted in mils, where one mil is a thousandth of an inch, and it typically runs from about 3 mil on a light retail single-serve up to 5 mil or more on a heavier, longer-shelf-life, or child-resistant build. Thin film on a complex shape tends to look wilted and can distort at the die line; a heavier gauge holds the silhouette and survives the fill and the freight. If your product is dense, oily, or sharp-edged, or if it has to sit on a shelf for a year, size the thickness up before you fall in love with the shape. The barrier layer matters too: a metallized PET or foil stack blocks light and oxygen far better than a clear laminate, which is why coffee, cannabis, and long-storage foods lean on foil constructions.

    Bar chart of typical total laminate thickness in mils by pouch use, from about 3 mil for light retail to over 5 mil for child-resistant heavy duty
    Heavier laminate holds a custom silhouette and survives the fill; match the mil to the product, not just the look.

    When to skip the die and print a rectangle

    Die-cutting is not always the right call, and knowing when to skip it is part of specifying well. On a first small test run, where the whole point is to learn whether the product sells, a plain pouch with strong artwork gets you to market faster and cheaper, and you can add the die once the format is proven. On a tight timeline, remember that a new cutting die adds roughly a week to a build that already runs on the order of ten to fourteen business days, so a custom shape can be the difference between making a launch date and missing it. And sometimes the shape simply fights the product: a dramatic outline that leaves thin, hard-to-seal necks, or a silhouette that wastes so much film it drives the per-bag cost past what the item can carry. In those cases a rectangular bag with a printed die-cut illusion, or a simple rounded-corner header, delivers most of the shelf impact for a fraction of the fuss. Spend the tooling where it changes the outline of your best seller, and let the rest of the line stay square.

  • How to Order Custom Mylar Bags: A Step-by-Step Checklist — Custom Mylar Bags Co.

    Call or Text us: (929) 605-4397
    Home › Blog › Buyer Guides

    How to Order Custom Mylar Bags: A Step-by-Step Checklist

    June 28, 2026 · Buyer Guides

    Ordering custom packaging for the first time can feel opaque. It isn’t. Here’s the exact sequence, so you know what to gather and what to expect.

    1. Pick your format and size

    Decide stand-up, flat, gusseted, or spouted, and the fill size (by weight or volume). If you’re unsure, tell us the product and how it merchandises and we’ll recommend a format.

    2. Choose material, finish, and closure

    Full foil, clear/window, or kraft; matte, gloss, or soft-touch; zipper, heat-seal, tin-tie, or child-resistant. These drive both barrier and cost.

    3. Send artwork

    Vector files (AI, EPS, PDF) are ideal. No print-ready art? Send a logo and a rough idea and our designers build it to spec, including bleeds and seal zones. Don’t forget required copy: net weight, ingredients, and any regulatory panels.

    4. Review your mockup

    We return a photo-real mockup — usually within one business day — showing exactly how the bag will print. Revise as many times as you need; revisions are always free.

    5. Approve, pay, and produce

    Once you approve, production runs about two to three weeks. We keep your files on record so reorders match exactly and skip most setup.

    StepWhat you provide
    Format & sizeProduct type, fill weight/volume
    Material & finishBarrier and look preferences
    ArtworkVector files or a logo to build from
    ApprovalSign-off on the mockup

    That’s the whole process. Start with a quote and we’ll guide you through each step.

    Key takeawayOrdering custom pouches is five steps: pick format and size, choose material and finish, send artwork, approve a free mockup, then produce. Vector files help, but we can build print-ready art from just a logo.

    Ready to start? Get a custom quote for your mylar bags, learn more about how we work, or browse more guides.

    Get a quote for custom mylar bags.

    Free mockup and bulk pricing within one business day.

    Get a Quote
  • Sustainable Mylar Packaging: Recyclable and Mono-Material Options — Custom Mylar Bags Co.

    Call or Text us: (929) 605-4397
    Home › Blog › Sustainability

    Sustainable Mylar Packaging: Recyclable and Mono-Material Options

    June 24, 2026 · Sustainability

    Flexible packaging uses far less material than rigid bottles and jars, but the classic multi-layer laminate is hard to recycle because it mixes materials. The good news: greener options exist and are improving fast. Here’s an honest look at what’s realistic today.

    Mono-material recyclable films

    The biggest shift is toward mono-material structures — pouches built primarily from a single polymer family (often all-PE) so they can enter store drop-off recycling streams. Barrier is achieved with coatings rather than a foil layer. Barrier performance is slightly below full foil but strong enough for many dry goods.

    Post-consumer recycled (PCR) content

    Some films now incorporate PCR content, reducing virgin plastic use. It’s a straightforward way to lower footprint without changing how the bag runs or looks.

    The barrier trade-off

    The honest tension is that the highest-barrier structures (full foil) are the hardest to recycle, while the most recyclable structures offer slightly less barrier. For coffee and highly oxygen-sensitive goods you may still need foil; for many snacks, dry mixes, and pet treats, a recyclable mono-material film performs well.

    OptionBarrierEnd of life
    Full foil laminateHighestHard to recycle
    Mono-material (PE)GoodStore drop-off recyclable
    PCR-content filmVariesLower virgin plastic

    Lighter freight either way

    Whatever structure you choose, pouches ship flatter and lighter than rigid packaging, cutting transport emissions. If sustainability is a priority, tell us your product’s barrier needs and we’ll recommend the greenest structure that still protects it.

    Key takeawayMono-material and PCR films make pouches meaningfully greener, with a modest barrier trade-off. For many dry goods a recyclable structure works; for coffee and oxygen-sensitive products, full foil may still be needed.

    Ready to start? Get a custom quote for your mylar bags, learn more about how we work, or browse more guides.

    Get a quote for custom mylar bags.

    Free mockup and bulk pricing within one business day.

    Get a Quote
  • Matte vs. Gloss vs. Soft-Touch: Picking a Pouch Finish — Custom Mylar Bags Co.

    Call or Text us: (929) 605-4397
    Home › Blog › Design

    Matte vs. Gloss vs. Soft-Touch: Picking a Pouch Finish

    June 20, 2026 · Design

    Two bags with identical artwork can feel completely different depending on finish. The coating you choose shapes how premium the pouch feels in hand and how it reads under retail lighting and on camera. Here are the four main options.

    Matte

    A matte laminate is understated and modern — no glare, soft to the eye, and increasingly the default for premium and “clean” brands. It photographs without hotspots, which e-commerce brands love. The trade-off is that matte can show fingerprints and scuffs more than gloss.

    Gloss

    Gloss is vivid and high-energy. Colors look saturated, the bag catches light, and it pops on a crowded shelf. It’s the traditional choice for snacks and confection where excitement sells. It can read less “premium” than matte for luxury positioning.

    Soft-touch

    Soft-touch is the tactile upgrade: a velvety matte coating that feels almost suede in the hand. It signals premium instantly and is a favorite for supplements, beauty, and high-end coffee. It’s a small cost adder that customers physically notice.

    Spot-matte / spot-gloss

    You don’t have to pick one. A spot treatment lets a gloss logo stand off a matte field (or vice versa), adding depth and a premium tactile contrast exactly where you want attention.

    FinishFeelBest for
    MatteSoft, modernPremium, e-commerce photos
    GlossVivid, shinySnacks, impulse, bold color
    Soft-touchVelvetyLuxury, beauty, supplements
    SpotContrastHighlighting a logo or hero element

    Not sure which suits your artwork? We’ll show finish options on your mockup so you can compare before committing.

    Key takeawayMatte reads premium and photographs cleanly, gloss maximizes shelf pop, and soft-touch adds a luxury feel. Spot treatments let you combine them to draw the eye exactly where you want it.

    Ready to start? Get a custom quote for your mylar bags, learn more about how we work, or browse more guides.

    Get a quote for custom mylar bags.

    Free mockup and bulk pricing within one business day.

    Get a Quote
  • Stand-Up Pouch vs. Flat Bag: Which Format Fits? — Custom Mylar Bags Co.

    Call or Text us: (929) 605-4397
    Home › Blog › Buyer Guides

    Stand-Up Pouch vs. Flat Bag: Which Format Fits?

    June 16, 2026 · Buyer Guides

    Once you’ve decided on mylar, the next fork is format: a self-standing stand-up pouch or a slim flat bag. They cost differently, ship differently, and merchandise differently. Here’s how to pick.

    Stand-up pouches: shelf presence

    The bottom gusset lets a stand-up pouch open into a flat base and stand upright, giving it real shelf and display presence and a large front-and-back print area. It’s the right call for retail SKUs, subscription hero products, and anything that needs to be seen face-out.

    Flat bags: cost and compactness

    With no gusset, flat bags lie flat, stack tightly, and cost less per unit. They’re ideal for samples, single-serve portions, refills, and inserts — situations where a standing shape isn’t needed and low unit cost matters most.

    Side-by-side

    FactorStand-up pouchFlat bag
    Shelf presenceHighLow
    Unit costHigherLower
    Ship volumeHigherVery low
    Best forRetail, hero SKUsSamples, single-serve

    The common answer: both

    Most brands end up ordering both in matching artwork — a stand-up pouch for the full retail size and a flat bag for the sample or single-serve. It extends the line and lets customers try before they commit. We can produce both in one coordinated order.

    Key takeawayUse stand-up pouches for retail shelf presence and flat bags for low-cost samples and single-serve. Many brands order both in matching artwork to cover retail and trial in one line.

    Ready to start? Get a custom quote for your mylar bags, learn more about how we work, or browse more guides.

    Get a quote for custom mylar bags.

    Free mockup and bulk pricing within one business day.

    Get a Quote
  • Child-Resistant Mylar Packaging, Explained — Custom Mylar Bags Co.

    Call or Text us: (929) 605-4397
    Home › Blog › Compliance

    Child-Resistant Mylar Packaging, Explained

    June 12, 2026 · Compliance

    Some products are legally required to ship in child-resistant packaging, and the rules can be confusing. This overview explains how certified child-resistant pouches work and how to keep a compliant bag looking premium. Requirements vary by product and location, so treat this as background and confirm your specific obligations.

    What “certified” actually means

    A pouch is child-resistant when its closure passes standardized testing (commonly ASTM D3475 and the 16 CFR 1700.20 protocol) showing that young children struggle to open it while adults can. For pouches, this is almost always a press-and-slide zipper: you press two points and slide simultaneously, a motion difficult for small hands.

    When you might need it

    Regulated categories — certain wellness, botanical, and household products among them — often mandate child-resistant packaging. Because the requirements depend on the product and jurisdiction, the safest approach is to confirm with your regulatory advisor before you print.

    Compliant doesn’t mean ugly

    The old assumption is that compliance means a plain, clinical bag. It doesn’t. The child-resistant closure is just a component; the rest of the pouch is a normal high-barrier mylar bag you can print edge to edge. The real skill is laying out mandatory warnings and panels so they’re present and legible without swallowing your design — something our team does routinely.

    What to confirm before ordering

    ItemWhy it matters
    Closure certificationMust be tested to the recognized standard
    Required warningsVary by category and jurisdiction
    OpacityMany categories require an opaque bag
    RecloseBag should stay child-resistant after opening

    Bring us your category and specs and we’ll build to a certified closure and help you place the required copy cleanly.

    Key takeawayChild-resistant pouches use a certified press-and-slide closure on an otherwise fully printable bag. Requirements vary by product and jurisdiction, so confirm yours — but compliant packaging can still look premium.

    Ready to start? Get a custom quote for your mylar bags, learn more about how we work, or browse more guides.

    Get a quote for custom mylar bags.

    Free mockup and bulk pricing within one business day.

    Get a Quote
  • Custom Coffee Bags: Valves, Gussets, and Freshness Explained — Custom Mylar Bags Co.

    Call or Text us: (929) 605-4397
    Home › Blog › Coffee

    Custom Coffee Bags: Valves, Gussets, and Freshness Explained

    June 9, 2026 · Coffee

    Coffee is the most demanding product a pouch can hold, because freshly roasted beans keep releasing carbon dioxide for days. Get the bag wrong and you either trap the gas (and swell the bag) or let oxygen in (and stale the coffee). Here’s how to spec a coffee bag that protects your roast.

    The degassing valve is non-negotiable

    A one-way degassing valve lets CO2 escape while blocking oxygen from entering. It’s what allows you to bag coffee at peak freshness rather than waiting days for it to off-gas. Every serious coffee bag should have one, and we build it in as a standard option.

    Side-gusset vs. block-bottom

    A side-gusset bag with a tin-tie is the traditional roaster look — pleated sides, easy reclose, timeless. A block-bottom (flat-bottom) bag stands rigid and boxy with more front-panel space and a premium, modern presence on the shelf. Both work; the choice is aesthetic and how much branding real estate you want.

    Barrier and finish

    Full foil gives the longest freshness; kraft laminate delivers the craft look with a hidden barrier. Add a resealable zipper or tin-tie so customers can reclose between brews, and consider a matte finish for a specialty feel or gloss for bold shelf pop.

    Spec checklist

    DecisionCommon choice
    ValveYes — always for whole bean
    ShapeSide-gusset (classic) or block-bottom (modern)
    ClosureTin-tie or press-to-close zipper
    BarrierFull foil or kraft/foil laminate
    Size12 oz and 5 lb are the most common

    Send us your roast sizes and the look you’re after and we’ll mock up a coffee bag that keeps your beans fresh and your brand sharp.

    Key takeawayA degassing valve is essential for whole-bean coffee. Pick side-gusset for the classic look or block-bottom for modern shelf presence, and match the barrier to how long the coffee needs to stay fresh.

    Ready to start? Get a custom quote for your mylar bags, learn more about how we work, or browse more guides.

    Get a quote for custom mylar bags.

    Free mockup and bulk pricing within one business day.

    Get a Quote
  • Foil vs. Clear vs. Kraft: Choosing a Mylar Bag Material — Custom Mylar Bags Co.

    Call or Text us: (929) 605-4397
    Home › Blog › Material Guides

    Foil vs. Clear vs. Kraft: Choosing a Mylar Bag Material

    June 5, 2026 · Material Guides

    “Mylar bag” is really a family of laminates, and the outer look you choose changes both the barrier and the brand impression. The three most common options are full foil, clear (or clear/foil window), and kraft-laminate. Here’s how they compare.

    Full foil: maximum protection

    A fully metallized or foil-layer bag blocks light, oxygen, and moisture almost completely, giving the longest shelf life. It’s the default for coffee, supplements, and anything sensitive to oxidation. The trade-off is that the product is hidden, so your print has to do all the selling.

    Clear and windowed: show the product

    A clear bag or a foil bag with a clear window lets shoppers see what they’re buying — valuable for colorful candy, pasta, or granola. Clear films offer less barrier than full foil, so they suit products that turn over quickly or aren’t highly oxygen-sensitive. A common compromise is a foil bag with a small window: strong barrier plus a peek at the product.

    Kraft: the craft, natural look

    Kraft-laminate bags show a natural paper exterior while hiding a foil or PE barrier layer inside, so you get an earthy, small-batch aesthetic without sacrificing freshness. They photograph as “artisan” and pair well with spot-color or minimal designs.

    Quick comparison

    MaterialBarrierBest for
    Full foilHighestCoffee, supplements, long shelf life
    Clear / windowLowerProducts that sell on visual appeal
    Kraft laminateHigh (hidden)Craft, natural, small-batch brands

    Many brands mix materials across a line — full foil for the flagship, a window for the visual SKU, kraft for the seasonal. We’ll help you match the laminate to each product when you request a quote.

    Key takeawayChoose full foil for maximum shelf life, clear or windowed when the product sells itself, and kraft laminate for a natural, craft look that still seals out oxygen.

    Ready to start? Get a custom quote for your mylar bags, learn more about how we work, or browse more guides.

    Get a quote for custom mylar bags.

    Free mockup and bulk pricing within one business day.

    Get a Quote