Every other spec on a mylar bag changes what gets printed on a rectangle: the material, the finish, the closure, the size. Die-cutting changes the rectangle itself. A die-cut bag is trimmed to a custom outline, whether that is a bottle silhouette, a rounded pillow shape, a header with a hang hole punched through it, or a bag cut to the shape of the product inside. The freedom is real and it almost always looks good on a shelf. It also adds a cost step and a lead-time step that a plain pouch does not carry. So the useful question is not whether a custom shape looks better. It is whether the shape earns its tooling, and answering that means knowing what die-cutting adds and where it actually pays off.
What “die-cut” actually means on a pouch
Die-cutting is the step that cuts the sealed laminate to a shape other than a plain rectangle. On short digital runs it is often done with a laser or a digital cutter, which needs no physical tool; on larger runs a shop builds a steel-rule cutting die, a one-time tool that stamps the outline for every bag in the order. Either way the cut has to register to the printed artwork, so a shape is not free-floating: your design and your outline are locked together, and a busy silhouette leaves less room for error at the edge. The most common die-cut feature is not a dramatic shape at all. It is a hang hole, or euro slot, punched into the top header so the bag can hang on a retail peg. Those slots run to a common size of roughly 32 by 10 millimeters, with round versions around 5 to 8 millimeters across, and the exact hole has to match the peg hardware in the store, so confirm it rather than assuming.
The three shapes that actually sell
Most of the value in die-cutting comes from three moves, not from novelty outlines. The first is the hang hole above: if your bag has to merchandise on a pegboard or a clip strip, that punched header is the difference between a product that displays and one that sits in a bin. The second is rounded corners, which read as more premium, are gentler in the hand, and remove the sharp points that snag on other packaging and catch during shipping. The third is a full custom silhouette cut to the product itself, which is the expensive option and the one that earns the most attention on a crowded shelf. A pet-treat bag cut like a bone or a juice pouch cut like the fruit does something a printed picture cannot: it changes the object’s outline, and the eye catches an unfamiliar outline before it reads any label. Reserve that move for the hero product, not the whole line.
Where the cost really lives
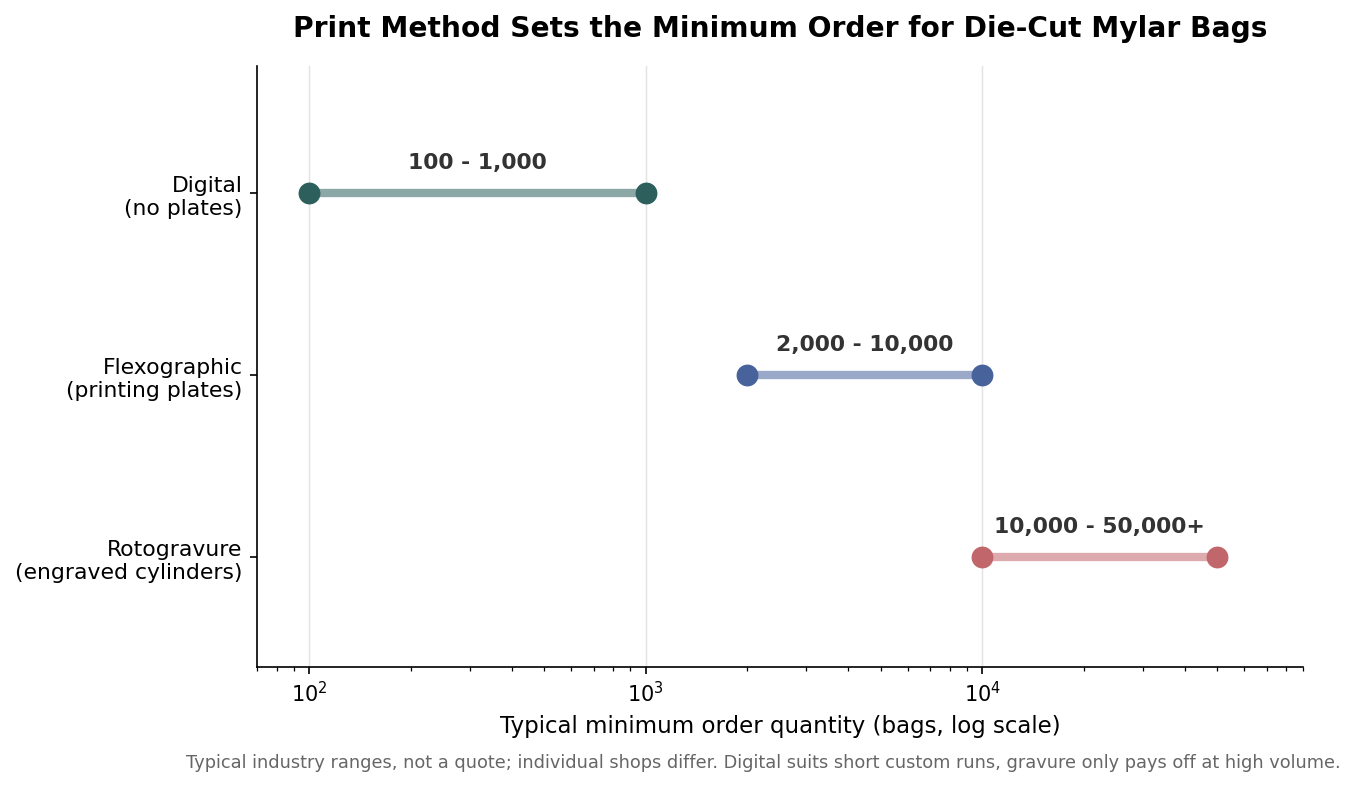
A die-cut pouch carries two costs a plain one does not. The first is the one-time tooling or die charge for a custom cutting die, and for plate-based printing a separate plate or cylinder charge for each color. Because those are one-time fees spread across the whole run, they barely register on a large order and hurt most on a small one. The second cost is simply that print method sets your minimum. Digital printing needs no plates, so custom shapes are available at low volumes, with minimums that often start around 100 to 500 bags. Flexographic printing brings plate costs and pushes minimums into the low thousands, and rotogravure, which gives the lowest per-unit cost at scale, only makes sense once you are ordering tens of thousands because you are paying to engrave cylinders first. The practical read is that a first custom-shaped run belongs on digital, and gravure is a decision you grow into.
Match thickness to the shape and the fill
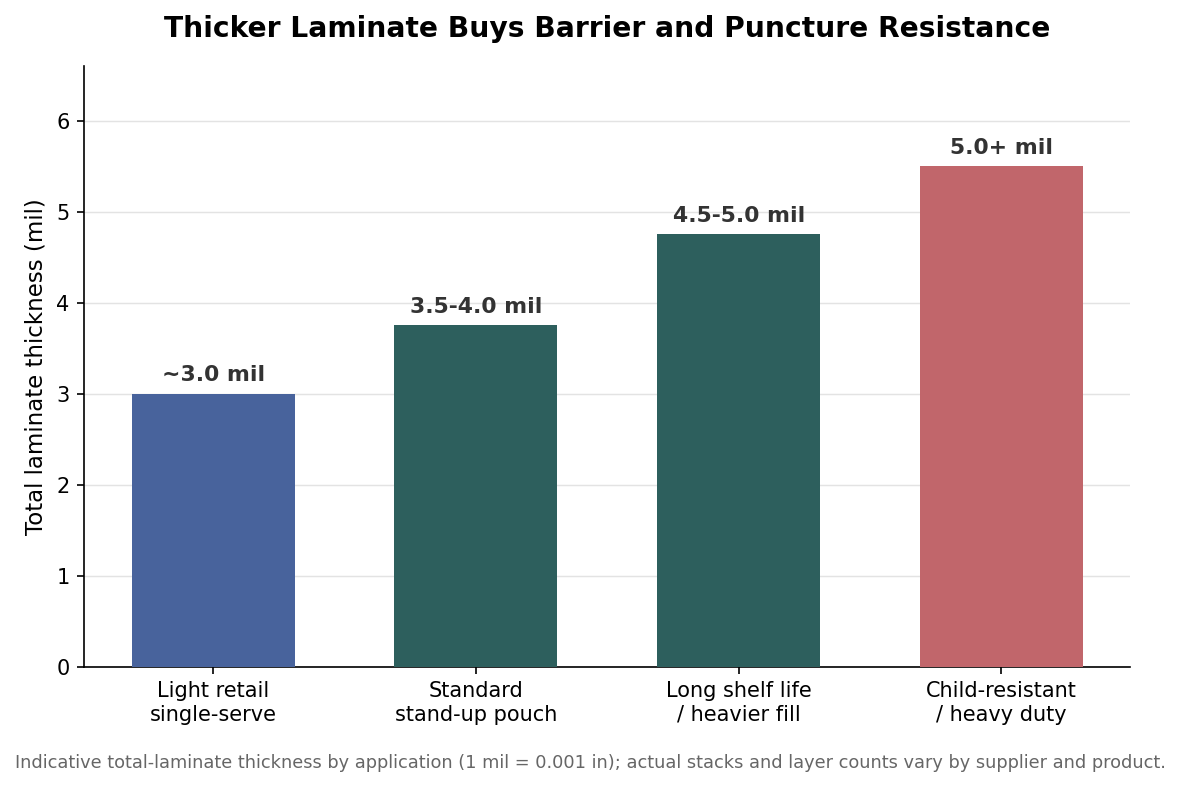
A custom outline puts more demands on the film than a rectangle does, because a curved or notched edge has to seal cleanly and hold its shape when the bag is filled. Total laminate thickness on a stand-up pouch is usually quoted in mils, where one mil is a thousandth of an inch, and it typically runs from about 3 mil on a light retail single-serve up to 5 mil or more on a heavier, longer-shelf-life, or child-resistant build. Thin film on a complex shape tends to look wilted and can distort at the die line; a heavier gauge holds the silhouette and survives the fill and the freight. If your product is dense, oily, or sharp-edged, or if it has to sit on a shelf for a year, size the thickness up before you fall in love with the shape. The barrier layer matters too: a metallized PET or foil stack blocks light and oxygen far better than a clear laminate, which is why coffee, cannabis, and long-storage foods lean on foil constructions.
When to skip the die and print a rectangle
Die-cutting is not always the right call, and knowing when to skip it is part of specifying well. On a first small test run, where the whole point is to learn whether the product sells, a plain pouch with strong artwork gets you to market faster and cheaper, and you can add the die once the format is proven. On a tight timeline, remember that a new cutting die adds roughly a week to a build that already runs on the order of ten to fourteen business days, so a custom shape can be the difference between making a launch date and missing it. And sometimes the shape simply fights the product: a dramatic outline that leaves thin, hard-to-seal necks, or a silhouette that wastes so much film it drives the per-bag cost past what the item can carry. In those cases a rectangular bag with a printed die-cut illusion, or a simple rounded-corner header, delivers most of the shelf impact for a fraction of the fuss. Spend the tooling where it changes the outline of your best seller, and let the rest of the line stay square.
Leave a Reply